Friday 14 December 2012

Hot Water Not Getting Hot, Heating Getting Too Hot

I was asked to look at a heating system because the lady was not getting any hot water when the boiler was on, and the only way she could get the hot water to heat was to put the immersion heater on. Also, she had also been struggling to control the temperature of her radiators. Even with the room thermostat turned down low the radiators were still heating up.

Looking in her airing cupboard there was a Honeywell V4073 three-port valve. The hot water was set to be on and the room thermostat was turned down low. Feeling the flow and return to the cylinder both pipes were only slightly warm. Feeling the lever on the valve head it was loose, and moved easily from side to side with no resistance. This indicates that the valve was open for the heating. 

After removing the casing from the valve I attempted to move the mechanism back to the hot water position manually. I was unable to do so and so removed the head from the valve body. As soon as I removed the valve head it sprung back to the hot water position. I felt the spindle on the valve body and that appeared to be moving with little resistance.

I replaced the motorised valve head with a new one and tested it's operation. The valve was operating correctly and heating was restored to the hot water cylinder.

Potterton Suprima Red Flashing Reset Light

Was called by a gentleman today who I had done work for in his previous house. He had moved to a new property but had been having trouble with the boiler and thought it needed servicing. I visited to service the boiler and look into any issues he was having with the boiler.

The boiler was a Potterton Suprima and the gentleman was regularly having to press the reset button as the red light was often flashing and the boiler was not running. The fault had been happening for the past six months but was gradually worsening. There didn't appear to be any set pattern as to when the boiler would lock-out and the red light would start flashing.

Pressing the reset button would get the boiler going again and it would carry on working for a few days without issue. However, being the winter, the problem was getting more of an issue as the gentleman would get up to find he had no heating or hot water just when he needed it.

I looked over the boiler and serviced it at the same time. The electrode looked to be clean and have the correct spark gap. The ceramic on the electrode looked to be in good condition. The ignition lead was not the original and it may have been that both the electrode and lead had been replaced in the past. The old electrode lead were prone to breaking down and causing ignition problems, they are sheathed with red insulation. The new electrode leads are sleeved in clear plastic, and thicker black plastc where the lead passes through the case.

It is a possibility that the boiler was overheating due to a fault with the thermistor and/or overheat thermostat but in my experience these generally fail and the boiler will lockout every time it runs. I have also experienced the gas valve failing to open which prevents the boiler from lighting. Again, I have found that this usually fails and cannot be resolved through pressing the reset button.

I dropped the panel down to reveal the PCB and could see that there was some signs of scorching to the PCB near the centre of the board. This is common on these PCBs and I expect is related to the lockout issue. There is usually a manufacturer's sticker on the PCB either on a relay or a semiconductor chip which has a sate code on it. This particular PCB was made in 1998 and has lasted well. There is also a date code in the bottom right-hand corner of the data plate, which again was 98, indicating that it was the original PCB.

I replaced the PCB with the new upgraded PCB kit, 5111603. This comes with a new PCB, housing, wiring loom and ignition leads. After fitting this part the boiler has been working well with no issue for the past fortnight.

Tuesday 11 December 2012

Heating and Hot Water Won't Turn Off

I received a phone call from a concerned customer because her boiler was running continuously and her hot water seemed to be exceedingly hot even though both the heating and hot water were turned off on the programmer.

A colleague of mine was in the local area and so he went round to check it out. Sure enough the boiler was still running when he arrived and the house was like a sauna. My colleague removed the programmer from it's baseplate and the boiler went off. Assuming that the problem was with the programmer he replaced it, tested the operation of the three-port valve and left as everything was working fine.

A couple of days later and I receive a phone call from the same lady because her heating and hot water won't turn off again. I went round straight away to find the boiler constantly running and the house like a sauna. The lady had turned the room thermostat right down and both the heating and the hot water off on the programmer.

I looked at the electrics and checked what voltage were where. There was 230 volts at the grey, 24 volts at the orange and on the white wire of the Drayton MA1 three-port valve the voltage exceeded the scale of my Fluke T3 Electrical Tester. It would seem that 24 volts is enough to power the switch live of the Worcester 15 Ri boiler which was fitted.

I disconnected the orange wire and hot water calling from the switch live to the boiler and the boiler went off.  The voltage was coming from the orange wire of the three port valve. I replaced the head on the motorised valve and re-tested the operation of the heating system, which has been working correctly for the past week.

Disclaimer:
The works described in this blog are a record of work undertaken and should not be taken as guaranteed to solve your problem.

Work should only be carried out by persons qualified and competent to do so.

Wednesday 28 November 2012

Worcester Bosch 28CDi No Hot Water

I was asked by a lady to look at her Worcester Bosch 28CDi combination boiler because her hot water performance had been gradually declining before failing altogether. The decline occurred over a couple of months and first began to affect the upstairs taps. The lady had already called another engineer who gave her a price to replace the entire diverter valve, and asked me to give her a price as we had previously done work for her.

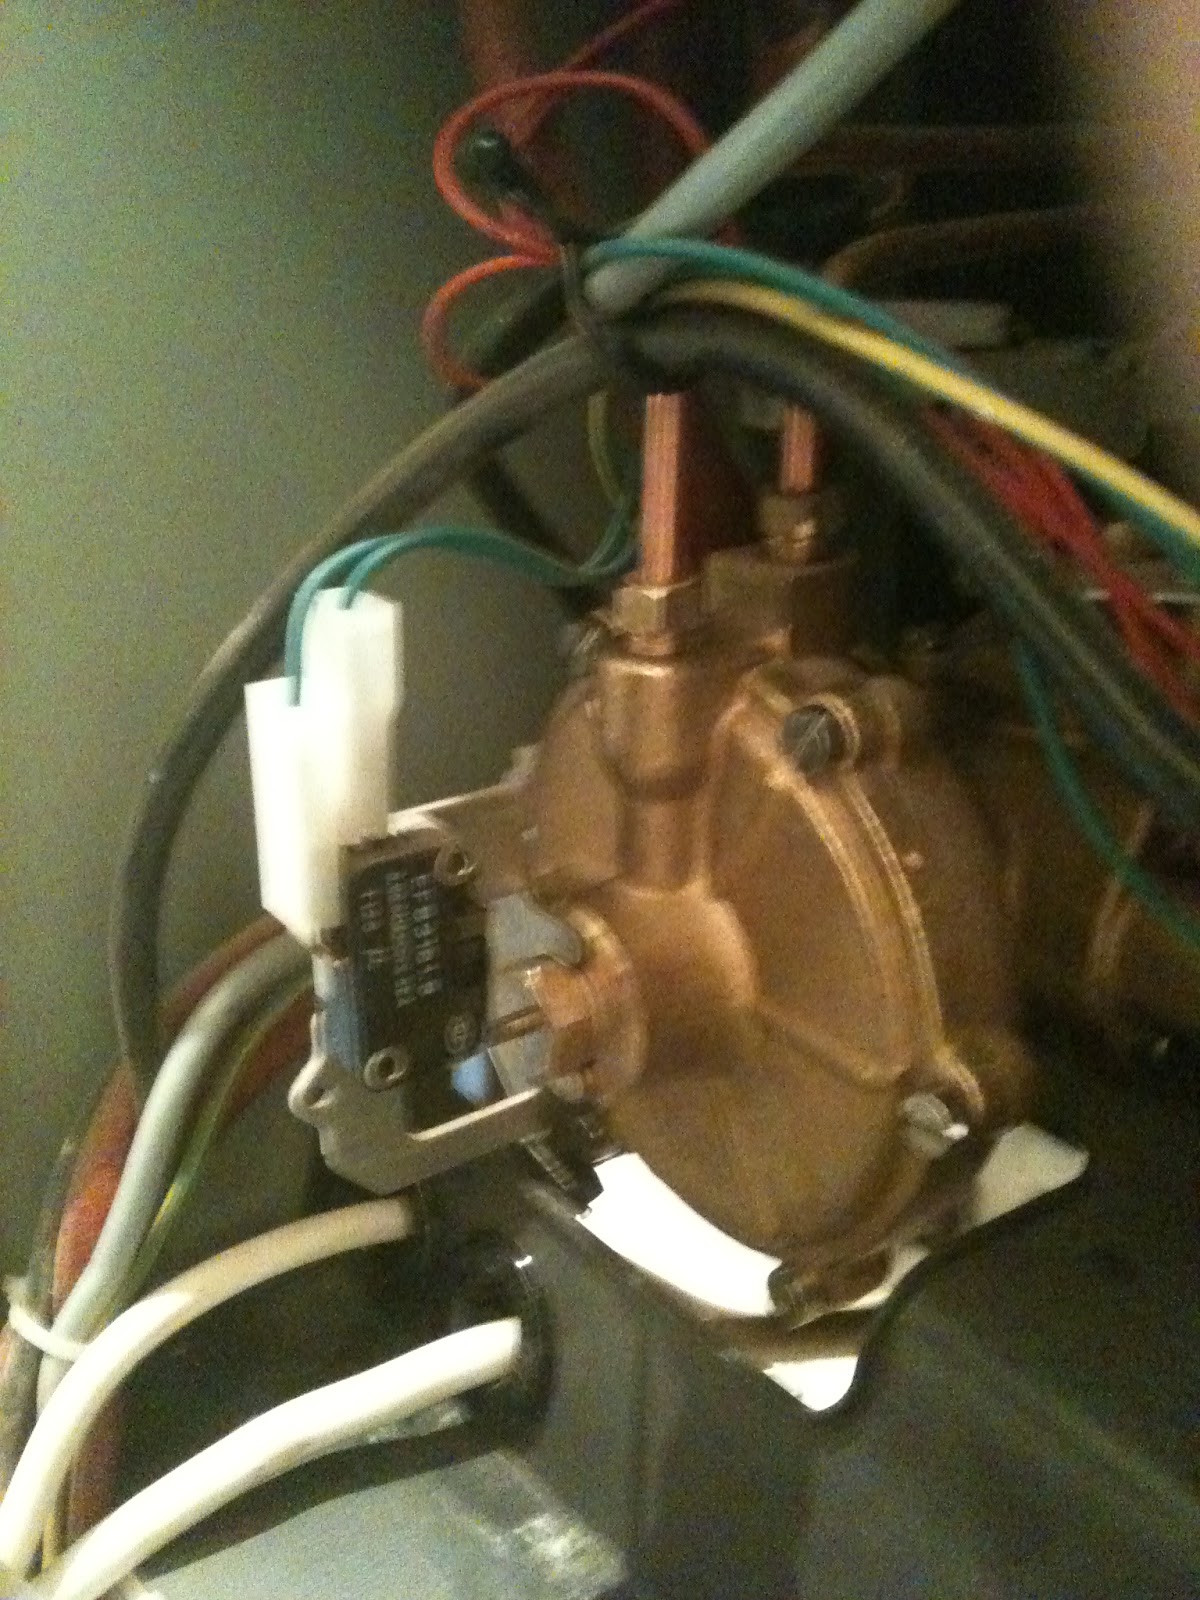
When I arrived the lady explained everything to me and so I tested the boiler to see what was happening. I ran the hot tap and nothing happened at the boiler. From below the boiler you can see the operation of the diverter valve and differential pressure valve. As I ran the hot tap the pin was hardly moving if at all to operate the hot water micro-switch. The lady explained that the hot water did work to some extent if the central heating was on. I put the central heating on and again opened a hot tap. Still the pin was not moving to an obvious degree. I asked about the temperature of the hot water as it was barely warm and the lady told me that it only came through hot once the heating had been on for some time.

It may have been that the boiler could have been repaired by replacing just the diaphragm inside the differential pressure valve. As the hot water had not been working at all and there was no visible movement of the hot water pin I decided that it would be best to replace the whole diverter valve as this is what I had quoted to do. I had brought the relevant diverter valve with me which are relatively inexpensive and fit a number of different boilers. Fortunately the valve also came with the associated o-rings and washers to make the job run smoothly.

I turned off the water supply and drained the water system as far as possible. I turned off both the valves to the boiler on the central heating circuit after warning the lady that they may require replacement. Operating the valves on a combination boiler is something I try to avoid doing as they often begin to leak due to their in-operation over the years. I chose isolate the boiler at the flow and return valves because the boiler was on the ground floor and only 18 inches off the floor which means it was one of the lowest points of the system. I then opened the white plastic drain points on the boiler which were completely blocked. Fortunately the boiler was high enough off the floor allowing me to get a bucket underneath and use a thin screwdriver to unblock the drain points.

With the boiler drained as far as possible the first task was to remove the filling loop. There are two screws at the left hand end that secure it to the heating manifold and it just pushes in to the water differential valve and seals using an o-ring. There is a metal plate which prevents the filling loop from moving to the left and coming out from its position. Once the two screws on the left hand end of the filling loop are undone the plate can be swung down and the filling loop gently twisted to get some movement before disengaging it from its location.

The next job is to remove the plate heat exchanger, which usually contains some water still and is worth putting a towel over the pcb housing for some extra protection. There is a clip on the top right of the plate heat exchanger which is held on by a screw which need to be removed. There is also a nut which needs to be undone and secures the plate heat exchanger to the diverter valve. The other two connections are just push-fit connections sealed by o-rings. So once the nut and the clip are undone the plate heat exchanger should be eased off the other two connection with a gentle twisting motion trying not to drop too much water over the pcb housing.

Now the diverter valve should be accessible.


The diverter valve needs to be removed in one piece with the differential pressure valve. Firstly, I disconnected the copper bypass pipe connected to the plastic flow manifold. I then undone the heat exchanger connection nut to the top of the diverter valve assembly. I pulled off the circlip securing the micro-switch to the right-hand end and pushed it up out of the way. There are a number of screws to be undone, I removed all the screws for the bracket on the right-hand end and four on the plastic flow manifold. The diverter valve should now be free to come out of the boiler. This diverter valve took some persuading as it was the original, I managed to add some leverage using a large screwdriver between the rear of the boiler and the diverter valve assembly.

Re-assembly is relatively straight forward if you replace and grease all the o-ring. The most stubborn o-ring to remove was the o-ring between the plastic flow manifold and the flow isolating valve. Due to its location it was difficult to get at and remove. I managed to get a thin screwdriver underneath it and snip it with the point of my Stanley knife. Fitting the bypass pipe back into the flow manifold before securing the flow manifold is also advisable. Don't forget to fit the new filter mesh to the cold water inlet. The metal locating bracket for the filling loop also needs to be slid over the diverter valve connection before refitting the plate heat exchanger. The plate heat exchanger wasn't lined up correctly the first time I fitted it and would advise to connect the nut to the diverter valve first.

Once everything was back together, I refilled the water and heating system. Fortunately there was no leaks. I tested the operation of the hot water which was working perfectly. I then tested the heating system and checked the radiators for air. Overall the job took 2 1/2 hours and I had only allowed 2. With the experience from this job I may be able to get it down to two hours but may quote for three in the future and take my time.

Disclaimer:
The works described in this blog are a record of work undertaken and should not be taken as guaranteed to solve your problem.

Work should only be carried out by persons qualified and competent to do so.

What can a new Boiler give you? by Tom Key, Direct Heating Supplies

This is a guest post from Tom Key, the Online Marketing Coordinator at Direct Heating Supplies. Direct Heating Supplies are one of the UK's leading suppliers of plumbing and heating supplies.


What can a new Boiler give you?

What do you look for in a boiler? Reliability? Cost effectiveness? Durability? The good news is that a new boiler can give you all of these things and more.

An inefficient, old boiler can cause much frustration and can also cost you a lot of money to restore it to full working order.

It is highly recommended that you arrange for gas and oil boilers to be serviced on a regular basis to clarify that your boiler and corresponding heating system is working efficiently in the appropriate manner.

Having a heating engineer out to look at an older system every year can help you to ensure that your boiler is working to the highest levels of heating efficiency possible (which can contribute towards a significant financial saving) and can help you to identify and resolve any potential issues before they get out of hand.

Unfortunately there are some times when you have to face the inevitable and acknowledge that to get the best levels of heating performance you may have to move to a new boiler that can offer a massive improvement in performance.

Older boilers generally offer a less efficient performance, purely due to the improvements in technology within the heating industry.  For example, the condensing technology that operates within a modern combi boiler makes it a lot easier to recapture heat energy that is produced by the boiler but would otherwise be lost via the flue along with waste gases and condensate.

This new development means that almost all new gas Combination boilers are SEDBUK A-rated, the highest possible efficiency rating available in the UK. Around £300 a year could be saved if you made the move from an older non-condensing G-rated Combi Boiler to a new and improved condensing combi boiler. That’s an efficiency saving of around 30% - a huge improvement.

Finding a spare heating part for an older boiler becomes much trickier over time as boiler ranges become discontinued and new boilers and parts are released. New boilers need less maintenance any way but if they do the parts are always readily available

For the most part new combi boilers last upwards of 10 years, so you will soon recoup the majority of money that you have spent on a new boiler system. New boilers tend to be covered by fairly extensive boiler warranty periods too, so you have added peace of mind that if anything goes wrong with your system you are in a good position to have it sorted out.

Although an expensive purchase, the benefits of a new boiler can be cost effective and can also be well worth it in terms of relieving unwanted stress!

About this article: This article was written by Tom Key, Online Marketing Coordinator at Direct Heating Supplies for use on the Gas Central Heating Blog.

LINKS:
·         Direct Heating Supplies - http://www.directheatingsupplies.co.uk/

Friday 23 November 2012

Radiators Not Getting Very Hot Downstairs

I went to look at the central heating system of a lady who was complaining that the radiators downstairs were not getting very hot. When the central heating came on the radiators upstairs all got nice and hot straight away, but the radiators downstairs would take an hour before they started to get hot.

I got to the job for eight in the morning so I could see what was actually happening as the heating was set to come on at 730. I looked around the radiators downstairs and only one of the small radiators downstairs was significantly hot. The others were just lukewarm except one which was stone cold. I looked around the radiators upstairs and they were all nice and hot as expected.

Looking in the airing cupboard where the programmer was located I could see that the heating and hot water were both set to be on. I checked the motorised valve and it was in the mid position, 'M'. Being a Drayton MA1 valve there is a sticker on the side which an indicator points to show the position the valve is in. The cylinder thermostat was set to 60°C and so I turned it down and the valve moved to the 'H', central heating position.

I waited for a few minutes and gradually the radiators began to heat up downstairs including the radiator that was completely cold. It appears that the water is going through the cylinder in preference to going round the radiators downstairs. When the hot water was set to be on at the same time as the heating and the cylinder thermostat was demanding hot water the radiators wouldn't heat properly downstairs until the hot water thermostat was satisfied. I checked the settings in the programmer and could see that both the heating and hot water where set to be on from 7am until 10am but in the afternoon the hot water was set to be on 3-5pm and the heating 5-10pm. I asked the lady if she noticed that the problem had only been occurring in the morning which she said it had, but"'assumed the downstairs radiators where working because they had got up to temperature in the morning".

I set the hot water so that it would come on from 6-7am which should be enough as she lives alone and will heat quicker than if on with the central heating. If that wasn't enough on some days the timer could always be put on for an extra hour. The system is fairly old and could most definitely benefit from a powerflush. Unfortunately this is something which she cannot afford at the moment but will probably have done in the summer. It would also be prudent to fit a gate valve to the hot water cylinder return to help balance the system.

Friday 16 November 2012

Baxi WM No Heating

I was left a message on my answerphone because a customer of mine had no central heating and asked me to attend the next day. He had told me that he could see that the pilot light was lit on his Baxi WM boiler and that the thermostat was turned up. He though it may be the pump as he had a pump seize before.

I attended in the morning, but unfortunately for myself the central heating had come on with the timer and had been working as it should be. The timer had switched off before I arrived and so I switched the heating on and the thermostat up. Everything was working with no obvious issues. I put the hot water on and tested the motorised valve to ensure that it was switching between heating and hot water as it should be. There appeared to be nothing wrong with the system.

The customer asked me to look at something unrelated which I did, and then went back to do a final test before leaving. On the final test I switched the heating on and the motorised valve began to move over but did not open fully enough to activate the micro-switch. I waited a few seconds longer but it still did not cause the boiler and pump to run. I put some pressure on the lever of the motorised valve and it moved further before activating the boiler an pump. I drained the system and replaced the motorised valve and everything has been working well since.

Disclaimer:
The works described in this blog are a record of work undertaken and should not be taken as guaranteed to solve your problem.

Work should only be carried out by persons qualified and competent to do so.

Main Combi HE Dripping Water

I received a call from a customer because they had water dripping slowly from the underneath of their Main Combi HE. Knowing these boilers quite well I had a goood idea of what the issue might be before I got there. When I got there I could see that the water was dripping from the left-hand side close to the front. I removed the front casing and dropped the controls casing down to reveal the inside of the boiler. Instantly I could see that the water was leaking from the differential pressure switch on the front of the diverter valve which is a common problem.


The diverter valves and differential pressure switches can also be found on other boilers (Baxi Combi 80, Baxi Combi 105, Potterton Performa and Alpha 240/280) and it is not uncommon for them to leak. The leak usually comes from where the pin exits the hex nut behind the micro-switch and worsens when the hot tap is run. I had an Interpart diapragm kit and so dis-assembled the differential pressure switch. Whenever I strip one of these down I always clean the pin with a bit of wire wool as there always appears to be some scale build up on the pin which could damage the seal on the new hex nut.


I reassembled the boiler and turned the water back on and tested that the pin was moving as it should be without leaking and that the boiler was behaving as it should be.

Disclaimer:
The works described in this blog are a record of work undertaken and should not be taken as guaranteed to solve your problem.

Work should only be carried out by persons qualified and competent to do so.

One Cold Radiator In Extension

I was asked to a look at a radiator recently that had not been working since the heating had been turned back on. The radiator was upstairs in the master bedroom which had been extended a few years previously and the radiator relocated. All the other radiators were nice and hot, and there was 16 other radiators. The customer had tried bleeding the radiator and to remove the head of the thermostatic radiator valve, but neither of these attempts got the radiator working successfully.

I removed the remainders of the head from the thermostatic radiator valve and pushed on the pin which was moving up and down perfectly. I then checked that the lockshield valve was fully open at the opposite end which it was. If there was an issue with balancing or circulation I would have expected one of the bigger radiators below to have been affected rather than an upstairs bedroom radiator.

I ensured the room thermostat was turned up fully and went around the house turning off all the other radiators. I checked back at the problem radiator and it was getting hotter to the pipe but the water was still not circulating through it. I looked in the airing cupboard and the system had two zone valves fitted and a bypass. The hot water was satisfied and the zone valve was closed accordingly, and I closed the bypass off. As soon as I turned off the bypass the full force of the pump pushed some air out of the pipework to the radiator and I heard it gurgle. Almost instantly the radiator was hot all over, and so I went around and turned all the other radiators and bypass back on.

The radiator continued to heat with the rest of the system up and running. I expect that over the summer air settles in the pipework to the radiator and prevents the circulation around that radiator. I expect when the radiator was relocated the installer used plastic pipe which because of the way it is often coiled never lies completely flat and leaves high points in the pipework for air to collect in.

Potterton Flamingo No Heating Downstairs

I received a call from a customer today that was worried about her heating. The radiators upstairs appeared to be working fine, but there was no heat at any of the radiators downstairs. It didn't matter that she turned the room thermostat right up they were not getting hot and when the boiler did come on it was only for a short period.

The programmer was set to constant for both heating and hot water, and the room thermostat was turned up high enough that the central heating should be on. Checking up in the airing cupboard the hot water was up to temperature and the motorised valve had moved over fully to the central heating position. The pump was also running although it didn't quite sound right. I thought that the cold feed may have been blocked but I felt the feed and vent and they both felt hot quite a way above where they tee in.

Pausing the rotation of the pump by moving the speed selector switch to a position between speeds didn't cause any gurgling which would suggest air or a lack of water preventing circulation. I also checked that the pump valves were both fully open. As everything seemed to be as it should I assumed that the pump was not spinning at the required velocity even though it did not look that old. I replaced the pump and switched the system back on and soon enough the radiators downstairs began to get warm.

Disclaimer:
The works described in this blog are a record of work undertaken and should not be taken as guaranteed to solve your problem.

Work should only be carried out by persons qualified and competent to do so.

Monday 12 November 2012

Glowworm Flexicom CX Heating Not Working Properly

A friend of mine who is also a heating engineer asked me to look at a Glowworm Flexicom CX which a customer of his was having trouble with. He had serviced the boiler 6-7 months ago and the lady had called him back because it was not working correctly and hadn't been since he had serviced it apparently. During the summer one of the radiators had been getting hot when the hot water was run for extended periods and warm even when the hot water was run for shorter periods.

With the winter weather turning colder the lady began to use her heating and not all of the radiators were getting hot. Two of the three upstairs radiators were getting red hot, the other lukewarm. One of the radiators downstairs was getting lukewarm but the others were hardly getting warm. The boiler was getting up to temperature really quickly and then cutting off taking a while to cool down before relighting. When the status display was on it would run through the central heating status mode as normal eventually ending up on S7 the central heating pump over-run status. Then it would go to S97 where the boiler checks the water pressure sensor, and suggests you check the connection to the water pressure sensor and that the pump has not seized. Both of which appeared to be fine. The boiler flow was very hot when the boiler was running and the return was barely warm.

Another engineer had previously removed and cleaned out the water pressure sensor just after the boiler had been serviced and said there was a fair amount of debris fouling it. My friend also said that there was some debris when he drained one of the radiators. From this I assumed that the diverter valve may have been fouled with debris and not moving correctly between the heating and hot water positions. I drained the boiler and removed the diverter valve. To remove the diverter valve all three of the screws had to be removed fully before the diverter valve would come out, the bottom one was particularly tricky to access but managed to get it out with some needle nosed pliers.

After removing the diverter valve the remaining water in the boiler which leaked inside the boiler was really clean and there was no sign of any debris in the diverter valve. However it didn't look as if the motor was attached to the spindle of the diverter valve. I removed the motor from the diverter valve assembly and the spindle was free to move. I reconnected the spindle and fitted the motor back to the diverter valve assembly.
I then re-filled and tested the boiler. I ran the hot water and it was heating and modulating as it should to heat the water to an even temperature. I then switched the heating on and the motor moved the diverter valve in towards the back of the boiler and the connection to the spindle was visible through the hole in the diverter assembley close to the white plastic section. Opening the tap the motor pulled the spindle back outwards, and stayed there for a while after the tap has closed before the motor pushed the spindle back in.

I checked around all the radiators and they were all getting hot as they should be.

Friday 9 November 2012

Potterton Promax Combi HE Low And High Pressure, Poor Hot Water

I was asked to service a Potterton Promax Combi HE as it had not been serviced since it had been installed. It was not that old but should have been serviced annually. When I arrived the customer had a list of issues with the boiler which also required investigation.

  • The boiler keeps losing pressure
  • The water pressure in the system keeps going into the red
  • The hot water keeps going hot and cold
  • One or two of the radiators were getting hot even though the heating was off
I looked over the boiler and asked if they had noticed any water leaks, which they hadn't. I looked at where the Pressure Relief Valve is terminated outside and could see that there was signs of it having let water out of the system. Having been leaking for while the PRV would require replacing as it was fouled with scale and debris from the system.

I topped up the water pressure to 1 1/2 bar and turned on the central heating system. It was not long before the water pressure in the system had risen and was close to the red. I turned off the heating and drained the pressure out of the heating system and checked the pressure in the pressure vessel. The pressure was low and with the drain point still open I increased the pressure in the vessel to the recommended amount through the schrader valve.

After setting the boiler back up I ran the hot tap and after running off the cold water in the leg of pipework it began to come through reasonably hot, and then cold, and then hot again and kept cycling like this without getting up to a satisfactory temperature. Watching the boiler I could see that it was rapidly getting up to temperature before cutting out, and was not transferring this heat to the hot water. When the boiler got up to it's maximum temperature it would send hot water out to the radiators explaining why a couple of the radiators had been hot at times through the summer. I removed the hot water plate heat exchanger and could see that it was quite badly blocked with debris and sludge from the system.

I replaced the PRV, plate heat exchanger and fitted a Adey Magnaclean filter to the system to protect the boiler from getting blocked again in the future. The system was only three years old and had been completely repiped with new radiators and treated with chemicals and yet surprisingly was in quite a bad state. I believe that some of the old pipework must have been re-used under the floor which was already fouled with scale and debris and not cleaned sufficiently when the new system was installed. Hopefully the Magnaclean will pick up the worst of the debris and keep it working as it should be.

Disclaimer:
The works described in this blog are a record of work undertaken and should not be taken as guaranteed to solve your problem.

Work should only be carried out by persons qualified and competent to do so.

Vaillant Turbomax Boiler Leaking

A customer of ours had a Vallaint Turbomax in a house that they recently moved into, which they had asked us to replace because of its age and inefficiency. They also wished for us to relocate the boiler to another area. The Vaillant Turbomax was of the VU/VUW range with the green control knobs. A week before we were going to replace it, a leak appeared from the underneath of the boiler.

The leak was only slow but needed immediate attention as the pressure was being lost from the system in less than a day. I could see that the water was coming from the right hand side of the boiler but could not see exactly as there was a panel on the underneath of the boiler. I opened the lower panel and dropped the controls down to see the diverter valve, etc. It was immediately obvious that the leak was coming from the automatic air vent, as there was water steadily appearing from the bleed pip.

I tried to screw the bleed pip down to stop the water from coming out of the cap but it would not seal. I dropped the pressure from the boiler and removed the top of the AAV. The float and mechanism of the AAV was fairly dirty and I may have been able to clean it up. However, I had a new AAV in the van which I dismantled and fitted to the boiler. This repair kept the boiler leak-free for another week and I was able to retrieve the AAV innards after replacing the boiler.

Disclaimer:
The works described in this blog are a record of work undertaken and should not be taken as guaranteed to solve your problem.

Work should only be carried out by persons qualified and competent to do so.

Monday 29 October 2012

Glowworm Ultimate No Heating or Hot Water

After returning from a holiday abroad to the cold of this country one of my customers had to call me out because they had no heating or hot water. The first thing I did was look at their Glowworm Ultimate boiler because they said that they could not see the pilot light. I removed the bottom tray and could see from the gas valve that there was no permanent pilot and that being the fan-flued Glowworm Ultimate had automatic ignition (the pilot lights itself as and when the boiler needs to fire up).

It was at this point that I noticed that the overheat button on the controls fascia was sitting out. I pushed on the button and sure enough it clicked as I reset it. As soon as I reset the overheat button the boiler came to life and fired up. I hung around at the boiler for a moment to ensure that the system was circulating and not likely to overheat immediately. The boiler was running fairly quietly so went to check around the rest of the system.

I told the customer that it may have been caused by a bit of air or if there was a power cut whilst the boiler was running. He replied by saying that he had been having unrelated issues just before he went on holiday. He had asked a friend of the family to replace the immersion heater which turned out to be faulty and kept tripping the electrics until it was replaced with another unit. The plumber had also broken a part on the heating system and ended up draining and refilling the system to replace it and the pump. Like I had already said the boiler overheating was either due to cutting out of the electrics or air in the system. After resetting the boiler the system is working as it should be again.

Disclaimer:
The works described in this blog are a record of work undertaken and should not be taken as guaranteed to solve your problem.

Work should only be carried out by persons qualified and competent to do so.

Glowworm Ultimate Whining Noise

I was called out at the weekend because a customer was concerned at the noise their boiler was making. Unusually I could even hear it over the phone whilst the customer was talking to me. It was quite a high pitched noise and almost sounded like there was a washing machine on fast spin. As soon as I heard it when I was in front of the boiler I could immediately tell that it was the fan that was making the noise.

Due to the was these boilers work the fans are subjected to quite high temperatures over their lifetime and it is no surprise that they fail. The bearings in the motor often dry out and begin to emit a whining noise. If left too long the friction in the motor can cause the fan to seize and burn out. Fortunately the customer was wise to the fact that something wasn't quite right and called me before they were left with no heating or hot water.

I replaced the fan, each if which is different for each model. The fans come on a plate which has varying sized holes in the bottom depending upon the boiler size. Also the bigger boilers have bigger windings on the fan to increase the rotation speed and exhaust of gases. The boiler is now running much better and the customer was surprised how much quieter the new fan is.

Disclaimer:
The works described in this blog are a record of work undertaken and should not be taken as guaranteed to solve your problem.

Work should only be carried out by persons qualified and competent to do so.

Hot Water Staying Hot Even Though Turned Off

A customer rang me to have a look at his hot water today as he was getting plenty of hot water even though it had not been set to come on for almost a week. Quite often I go to have a look at this fault to find that the immersion heater has been turned on by the wife or kids! When I looked in the airing cupboard the immersion heater was wired into a plug and clearly unplugged.

Looking at the timer the central heating was set to be on through the day and the hot water was off.  I turned up the room thermostat to bring the pump and boiler on. I then waited in the airing cupboard feeling the pipes to find out where the heat was going. The heat appeared between the pump and motorised valve first of all and could be felt going to the radiator circuit. The radiator circuit being port A of the motorised valve. The pipework between the valve and the motorised valve was very short making it difficult to gauge the temperature of the hot water travelling within the pipe due to the transfer of heat back from the cylinder. I felt the pipe on the cylinder return, which is the lower connection and could feel it slowly starting to get warm.

I decided that it was almost definitely the motorised valve at fault and decide to replace it. When the valve had been removed I could see that when the valve was in the central heating position port B for the hot water was not being closed off fully. Had the valve been open wider I'm sure the customer would have been complaining that their hot water was excessively hot because it would have been heating the whole time the heating came on.

I replaced the motorised valve and retested the system to make sure that the valve was moving as it should and that their was no air in the system and all the radiators got hot. Once everything was up and running I left the heating and hot water set on the timer.

Disclaimer:
The works described in this blog are a record of work undertaken and should not be taken as guaranteed to solve your problem.

Work should only be carried out by persons qualified and competent to do so.

Friday 26 October 2012

Boilermate 2000 No Hot Water

I was called by one of our customers because she had no hot water, and running a hair styling business from home it was urgent. I visited to find a Glowworm Ultimate and Boilermate 2000 cylinder. The lady had tried to put the electrical boost function on the cylinder but was still not getting any hot water.

I looked inside the cover of the Boilermate 2000 cylinder and could see that the display on the PCB was blank, although two of the green LEDs were lit and two of the pumps were running. Pushing the little buttons on the PCB to toggle through the displays of the circuit board was not having any effect. For some reason the PCB had failed and was no demanding heat from the boiler or operating the boiler pump. There was no GT155 PCB in stock locally or available next day from our suppliers and had to be ordered for the following week.

I looked into the electrical side of the Boilermate Cylinder and could see that the immersion heater had been wired up, and that there was wiring to the cylinder for the electrical side. However, the fuses were pulled out and secured out with a cable tie and the electrical side had never been commisioned at installation. I advised the customer to contact and electrician to check the electrics which got the hot water heating again temporarily until I was able to return with a new PCB.

Disclaimer:
The works described in this blog are a record of work undertaken and should not be taken as guaranteed to solve your problem.

Work should only be carried out by persons qualified and competent to do so.

Baxi Solo WM 30/4 RS No Hot Water

I was called to look at a Baxi Solo WM 30/4 RS which was not working and the lady had ran out of hot water. Immediately I could see that the pilot was not lit and attempted to relight the pilot light. It would not stay lit and being the SS version had an overheat thermostat interrupting the pilot thermocouple at the gas valve. Once I had reset the overheat thermostat I was able to relight the pilot light and the boiler was able to fire for the hot water.

As soon as the main burner came on I could hear that the boiler was unusually noisy and so checked the burner pressure which was as it should be. The pump which was adjacent to the boiler was fairly old and didn't quite sound as if it was running at the correct speed. I replace the pump and refired the system and the boiler was running a lot more quietly and didn't sound so scaled up.

After the boiler ran for about five minutes it started to crash and bang before cutting out on the overheat thermostat. I used my flue and gas analyser to measure the flow and return temperatures to find that the flow temperature was exceeding what it should have been and the boiler thermostat was not cutting off the boiler until the overheat thermostat kicked in. I replaced the Ranco C77P0135 thermostat and the system was working well again.

Disclaimer:
The works described in this blog are a record of work undertaken and should not be taken as guaranteed to solve your problem.

Work should only be carried out by persons qualified and competent to do so.

Ideal Classic Clicking Noise

My boss was called to look at an Ideal Classic boiler because the customer was complaining that it would regularly make a clicking noise for an extended period of time whilst the boiler was running. He visited but could hear no noise, although the customer said it had been making the noise all afternoon. He left them to monitor the situation.

They soon called him back because it was still 'clicking' more or less constantly. Once again the boiler was working perfectly upon his arrival. He assumed that it may have been one of the gas valve solenoids breaking down and causing the boiler to constantly re-light. He changed the gas valve and left with the boiler working perfectly.

Being on call the following week the customer called me out because the boiler was still 'clicking' and the problem had not been solved. Once again, I arrive to find a boiler working perfectly that had been 'clicking' all morning. Using my experience I looked at the PCB as I recall having the same problem before. I could see that there was some blackening to the relays on the PCB. When the relays become blackened I think it is more difficult for them to maintain contact and do their required task. I replaced the PCB and left the boiler working. I had to re-visit the customer a week later for an unrelated issue and he said the boiler had been working silently since my visit.

Disclaimer:
The works described in this blog are a record of work undertaken and should not be taken as guaranteed to solve your problem.

Work should only be carried out by persons qualified and competent to do so.

Glowworm Cxi Dripping and G10 Seal

A friend of mine recently moved into a new house and asked me to look at his boiler as there was a couple of outstanding issues left by the previous owner. Before moving into the house he had been told by an engineer that inspected the heating system that the boiler required a new G10 burner door seal. He was also told by the previous owner that there was a regular drip, hence the bowl underneath.

Looking at the burner door I could see that the boiler had the earlier burner door seal fitted. The main seal looked to be ok, but there was signs of staining at the bottom of the burner door where the smaller seal is. I knew it was likely to be the earlier seal as the burner door was secured using the earlier nuts which are not of the Nyloc type. I removed the burner door and exchanged the earlier 'rubber' seal for the graphite one. The lower seal is still made of 'rubber'. I also filled in the label with the date and stuck this to the boiler so the seal should get replaced in five years time.

The dripping I immediately noticed was coming from the disconnnector. The disconnector valve is the fancy non-return valve they have fitted to the built-in filling loop. It is quite common for them to drip just after re-pressurising the system, and sometimes the dripping stops after a minute or two. Unfortunately  the disconnector had been dripping for an extended period and required replacement with part number 802600. This part comes with a new disconnector valve and an upgraded filling tap. The earlier taps were plastic internally and use to seize and break shut, whereas the new ones are brass internally.

Had the disconnector not been leaking it would have been cheaper, and quite easy on this installation to use a standard filling loop on the existing pipework. After installing the new filling loop I repressurised the heating system which due to the low local water pressure was a struggle to get to 1 bar. The disconnector dripped after filling for a short period which I expect is a consequence of the low water pressure and would consider fitting a standard filling loop on my next visit.

Disclaimer:
The works described in this blog are a record of work undertaken and should not be taken as guaranteed to solve your problem.

Work should only be carried out by persons qualified and competent to do so.

Thursday 25 October 2012

Glowworm Compact No Central Heating

Was asked by a lady to look at her Glowworm Compact as her central heating was not working. The hot water was working, but she did complain that it was a too hot if anything of late. The lady could not understand why the boiler was constantly running even though the central heating was turned off on the timer.

Looking at the boiler it was running even though the timer was turned off. Looking at the symbols on the boiler I could see that the tap symbol was illuminated even though there were no taps running and the boiler pump was running. I turned the timeclock on but nothing changed with the boiler. I opened the tap and the water was very hot, and cooled a bit before the boiler fired up.

After I turned off the tap, the boiler still continued to run for a while before getting too hot and cutting out. The tap symbol remained illuminated. I ran the tap on and off a couple of times and the tap symbol extinguished, then the heating symbol came on and the heating began to work. I tried the hot water once again, and after I turned the tap off the tap symbol stayed illuminated.

I removed the hot water microswitch on the right hand side from it's position over the pin which operates it. Once removed the hot water symbol extinguished and I could see that the pin was still out quite a way as if a tap was open. I was able to push the pin back in with my hand which I should not be able to do if a tap was actually open.

I replaced the diaphragm (Parts Center 440776) in case it had stretched and the diaphragm cover (Parts Center 440100) in case the pin was corroded and sticking. Another happy customer with working heating and hot water.

Disclaimer:
The works described in this blog are a record of work undertaken and should not be taken as guaranteed to solve your problem.

Work should only be carried out by persons qualified and competent to do so.

Glowworm Cxi Dripping Water

I was called by a customer to look at a Glowworm Cxi which intermittently would have water dripping from underneath. The customer had a bowl underneath the boiler and pointed to the corner of the case on the front left at the bottom and had seen water dripping from there.

I looked around the bottom of the boiler and could not see any signs of water on any of the joints or at the disconnector. I opened the case of the boiler to see if there was any signs of water inside the case. I could see some brown staining on the 'floor' of the inner case and it ran across from the front left corner to the condense trap. There was a couple of droplets sitting on top of the condense trap.

I checked the route of the condense pipe which ran into the waste pipework below the kitchen sink. Fortunately it was connected using threaded fittings and so I was able to disconnect the condense pipe from the waste pipe easily. Sure enough it was full of gunge due to the way it had been connected in under the sink, waste had been slowly accumulating in the condense pipe before blocking it up. I managed to get a fair amount out into a bowl. Leaving the condense disconnected I poured a little water into the inner flue using a jug which flushed through the condense pipe.

During the summer their probably was not a great deal of condensate produced with just the hot water in use. However, turning the heating on revealed the problem as the amount of condensate would be increased.

This has solved the leak in the short term but have advised the customer to have the drainage altered to prevent the condense from blocking again because it could cause more expensive damage.

Disclaimer:
The works described in this blog are a record of work undertaken and should not be taken as guaranteed to solve your problem.

Work should only be carried out by persons qualified and competent to do so.

Honeywell Programmer No Hot Water/Central Heating

I was called to look at a system because the customer was complaining that they had no hot water but that their heating was working. For a system with a three-port valve this is unusual but not impossible. Looking in the airing cupboard I remembered that I had fitted a new Honeywell motorised valve last year so thought it unusual that it should fail. Their was an old Potterton PTT2 cylinder thermostat so thought that this may be the issue.

I put the hot water on at the programmer and returned to the airing cupboard. The cylinder thermostat was lit to say it was demanding heat and I could feel that their was circulation around the hot water circuit. I turned the cylinder thermostat up and down and it was responding to my demands. All working with no problems.

I put the heating on and waited for the radiators to get hot. I waited and nothing happened. Strange, I've come to look at why there is no hot water which is working and now I have no central heating. Returning to the airing cupboard I checked the electrics in the junction box. There was no power on the white, and there was also no power to the room thermostat from the programmer.

I went back to the programmer, Honeywell ST9400, which I had fitted five months ago and turned the heating and hot water off. I then turned the heating back on, five seconds later the boiler fires up and the radiators have started warming. I turn the hot water back on, and now this isn't working. Usually when either the heating or hot water is switched on their is a click and the related green light illuminates. However, in this case both the lights would come on but their would be no click from either the heating or the hot water depending upon which you switch on second.

I fitted a new Danfoss FP715 programmer and set the dipswitches to the 7-day mode and everything was working as it should be.

Disclaimer:
The works described in this blog are a record of work undertaken and should not be taken as guaranteed to solve your problem.

Work should only be carried out by persons qualified and competent to do so.

Baxi Solo 3 No Heating

As always when it turns cold I get numerous calls to look at heating systems because the central heating is not coming on and the homeowner has no idea why. The lady in question had turned everything off because in the morning when the heating was supposed to come on she was disturbed by a loud clanging noise coming from the airing cupboard.

As I usually do I began by ensuring that the hot water was working correctly and set the hot water to come on. The pump kicked in and sounded as if it was working fine, I went to the garage to check on the Baxi Solo 3 which was lit and running. I returned to the airing cupboard and could feel that the hot water was circulating with no issues.

I then turned the hot water off and set the heating to be on, as I returned to the airing cupboard the clanging began. The motorised valve installed was a Tower valve with a red plastic body which in my experience are not the best valves. As it was trying switch over to heating the mechanism was slipping. It would open so far before the tension of the spring got too much and clanged the valve back to hot water. I drained the system and replaced the three-port valve leaving another happy customer.

Disclaimer:
The works described in this blog are a record of work undertaken and should not be taken as guaranteed to solve your problem.

Work should only be carried out by persons qualified and competent to do so.

Ideal Classic Sealed System Tripping Electrics

I was called by a customer because his electrics kept tripping off, and he had isolated the problem to be with his central heating system. He suggested that the consumer unit tripped off whenever the heating came on. I decided to test the system to narrow the fault down.

Firstly I switched the boiler off on it's power switch before turning the fused spur back on. The electrics stayed on and so I switched the hot water on. The system has two zone valves and so after a few seconds the valve opened and powered the pump. As soon as the pump started I could hear that it was making an unusual noise but still sounded as if it was working, then after five seconds the power tripped out. I reset everything and decided to try the central heating, and everything tripped out in exactly the same way about five seconds after the zone valve opened.

I removed the casing around the sealed system unit and then altered the position of the pressure vessel to enable access the electric of the pump. After removing the electrics cover form the pump I could see that there was quite a lot condensation within the pump electrics and this was without doubt the cause of the problem. I replace the pump and set the system going again, and all was working correctly.

Disclaimer:
The works described in this blog are a record of work undertaken and should not be taken as guaranteed to solve your problem.

Work should only be carried out by persons qualified and competent to do so.

Baxi Combi 80e No Heating or Hot Water

A retired gentleman called me to look at his Baxi Combi 80e because he had neither heating or hot water. Unfortunately, being elderly he is unable to get into the loft to check on the boiler. Contrary to Building Regulations the loft does not have fixed access, although it is lit and boarded. Regardless  of this, the poor old boy would not be able to ascend or descend a ladder and calls me regularly.

As soon as I looked at the boiler I could see that the water pressure in the system was very low and the 'pump' warning light was flashing to indicate that there was no circulation. This is the 60 degree light. I refilled the system to 1.5 bar using the filling loop, set the heating on and tested the hot water. The hot water was working again fine, but when I returned to the loft I could see that the water pressure in the system had increased significantly, and so turned the heating back off.

I fetched my hose and pump out of the van. I connected the hose to the system and let the pressure out leaving the drain-off cock open. I then connected my pump to the Schrader valve on the pressure vessel and the gauge on my pump was showing zero pressure. I preceded to pump up the pressure in the pressure vessel until the pressure was steady at 0.8 bar. I then turned off the drain-off cock and refilled the system to 1.5 bar. This time when I ran the system, the radiators got hot and there was a normal increase in system pressure.

Disclaimer:
The works described in this blog are a record of work undertaken and should not be taken as guaranteed to solve your problem.

Work should only be carried out by persons qualified and competent to do so.


Potterton Suprima Flashing Red Lockout Light

A customer asked me to look at his Potterton Suprima because on a number of occasions over the last  fortnight he had been running out of hot water and going to the boiler to find that the red light was flashing. He would reset the boiler and it would continue working for a couple of days before it required resetting again.

The boiler had the earlier 407750 style PCB which are renowned for their tendency to lockout for no good reason. I suspected that the circuit board would probably be at fault but as always looked over the boiler to see if their was any other obvious faults which would cause the boiler to lockout. My first port of call was to look at the ignition of the boiler and it's associated parts. The ignition leads can often break down through age and repeated servicing, but the lead looked to be in good condition and not the original lead.

I then looked at the ignition electrode to see if it was fouled or distorted. The gap from the electrode to the burner is usually the same as the thickness of a pound coin but looked less. I touched the electrode with my finger to find that it seemed loose and would rotate within the ceramic. I replaced the electrode, 8407754, and the boiler has been working fault free for the last couple of weeks.

Disclaimer:
The works described in this blog are a record of work undertaken and should not be taken as guaranteed to solve your problem.

Work should only be carried out by persons qualified and competent to do so.

Worcester Bosch Greenstar 24Ri Blue Flashing Light

A customer called me worried because the blue light was flashing on his Worcester Greenstar 24Ri and he was worried that it had developed a fault. When I arrived, he switched the controls on and the boiler's blue light began to flash straight away. Apparently, he had noticed the blue light flashing a few days ago but the heating and hot water seemed to be working as they should be. I thought that the the boiler would stop working if the blue light was flashing so thought this strange.

Fortunately, the gentleman had the manual to hand for me to consult. I looked at the fault finding pages where it gives a description of the different statuses and faults that may have occurred indicated by the blue light. The installation and servicing instructions can be downloaded from Worcster-Bosch which contain the fault finding on page 51.

As soon as I looked in the book I realised that the light was actually pulsing rather than flashing which is the indication that the boiler is in it's service mode for measuring the flue gases at the boiler's maximum rate. I removed the cover which allows access to the service mode switch, and expected to find the tool for the service mode selector switch still inserted. The tool was parked in it's clip where it should have been, and the switch when turned to the normal position was only a fraction away from the normal position.

A junior colleague had been to service the boiler just over a week prior, and had obviously failed to turn the service selector switch fully back. After resetting the switch to the normal position the boiler was working as it should be with the blue light on and not flashing.

Disclaimer:
The works described in this blog are a record of work undertaken and should not be taken as guaranteed to solve your problem.

Work should only be carried out by persons qualified and competent to do so.


Glowworm Spacesaver No Heating

I was asked to look at a heating system the other day because the customer's central heating was not working. The customer could see that the pilot light on their Glowworm Spacesaver was alight but the heating was not working when the controls were calling for heat and the boiler was no firing up.

I tested the hot water and sure enough the boiler fired up and the system was running perfectly for hot water. I then turned the hot water off and put the central heating on and nothing happened. I checked in the junction box to make sure there was power on the grey and white wires to the motorised valve, which there was.

I then drained the system and replaced the Boss three-port valve with another motorised valve, refilled and heat tested the system and all was working well again.

Disclaimer:
The works described in this blog are a record of work undertaken and should not be taken as guaranteed to solve your problem.

Work should only be carried out by persons qualified and competent to do so.

Ideal Minimiser Not Lighting

I was called to look at an Ideal Minimiser by a customer today as their boiler had required resetting a couple of times in the week after noticing that the heating and hot water were not working.

I ran the boiler and it appeared to be running and lighting with no issues. I could hear the spark across the electrodes which was rapid and maybe more prolonged than it should have been. I let the boiler cool a littler before stripping out the fan and burner.

As can be seen from the picture above, both the sensing probe and electrodes were distorted and required replacement. There are a number of different setups that can be found on these boilers and this is the original burner plate and electrodes. As far as I am aware the original electrodes cannot be replaced as they are. The new electrodes are stouter and come with a new burner mounting plate. The newer boilers had an atmospheric kit fitted and some older ones have it retro-fitted. On these boilers there is no tube connected to the burner plate. If there is no atmospheric sensing kit fitted then then the burner plate replacement will need to have an orifice for the existing tube which connects in on the right hand side of the burner plate.

I replaced the burner plate and electrodes Parts Center no. 462190, and the boiler has been of no trouble since.

Disclaimer:
The works described in this blog are a record of work undertaken and should not be taken as guaranteed to solve your problem.

Work should only be carried out by persons qualified and competent to do so.

Glowworm Ultimate Cutting Out After Five Minutes

I was asked to look at a Glowworm Ultimate that was not working correctly. The customer was complaining that the boiler only seemed to come on for five minutes before cutting out and that the heating was not getting hot.

When I arrived I put the hot water on and that appeared to be running correctly, they had a tank full of hot water and the system sounded as if it was circulating correctly. I put the heating on and there was no reaction from the system and I checked that the room thermostat was turned up, which it was. I then checked in the junction box for the heating system to find that there was power on both the white and grey wires to the motorised valve after turning the hot water off.

I replaced the head on the Drayton MA/1 three-port motorised valve, and retested the system which was no operating correctly. It would appear that the heating may have been coming on when the valve was in the mid position but not moving over fully to supply heating only.

Disclaimer:
The works described in this blog are a record of work undertaken and should not be taken as guaranteed to solve your problem.

Work should only be carried out by persons qualified and competent to do so.

Tuesday 7 August 2012

Glowworm Ultimate Buzzing with Boilermate 2000

We were asked to check out a heating system and service a Glow-worm Ultimate boiler. As I removed the case I got a whiff of gas, and decided to carry out a soundness test. There was a drop on the test and I turned off the isolator at the boiler and re-tested which was successful. I replaced the gas valve and carried out the service.

A couple of days later I was called back because the hot water had gone cold, and the boiler had been making a buzzing noise the previous night. When I visited there was plenty of hot water and there was no sign of any problems with the boiler.

About a week later a colleague of mine was called out because the boiler was buzzing again, and so decided to replace the PCB.

Another week later and the boiler was buzzing again. I ran the boiler and again it was running as it should be. The boiler was connected to a Boilermate 2000 thermal store which controls whether the boiler was on or off and so I decided to look closer at the cylinder. There a couple of switches you can press to display information about the thermal store and when I pressed these there was no change in the display. I also tested the operation of the heating and hot water. Strangely the cylinder would call for heat from the boiler and the boiler would run for a while heating the store. When the cylinder was satisfied the boiler would go off  but the pump would continue running indefinitely. The hot water circulation pump also seemed to be running extensively. When running the central heating the central heating pump seemed to be stopping and starting as it should.

I removed the circuit board from the Boilermate 2000 and could see on the rear that there was a number of dry joints. I replaced the Appliance Control Board (PCB) XB255 on the Boilermate 2000 and all has been working well since.


Disclaimer:
The works described in this blog are a record of work undertaken and should not be taken as guaranteed to solve your problem.

Work should only be carried out by persons qualified and competent to do so.

Hermann Ikon 23T

I went to look at a Hermann Ikon 23T which is also known as a Icon 23T and I believe was made by Hepworth and sold through Travis Perkins. The boiler was not working for either heating or hot water.

Upon opening a hot tap and the boiler would start up, the fan would run and the pump would kick in. The electrode would also spark. The spark would stop and the red warning light on the right hand side would illuminate.

I checked for gas pressure at the valve inlet which was good. The pressure was not fluctuating when you expected the gas valve to open. I took the cover off the PCB attached to the gas valve and checked for voltage on the solenoid connections. There was 240v at both the upper and lower pins.

I replaced the gas valve which was a Sit Sigma 845 and the boiler was working as it should be again.


Disclaimer:
The works described in this blog are a record of work undertaken and should not be taken as guaranteed to solve your problem.

Work should only be carried out by persons qualified and competent to do so.

Monday 6 August 2012

Ideal W2000 No Heating or Hot Water

I got called out at the weekend to look at an Ideal W2000 which was not working for either heating or hot water. The customer said he could hear the pump running when the hot water was set to be on but the boiler was not firing. He turned the hot water off and turned the heating on and again could hear the pump running but the boiler still was not lighting. The customer also reported that the pilot light was still lit.

Before I arrived I already had a good idea of what the problem could be. Firstly I checked that the 'kettle plug' electrical connection was fully in the control box connection. I removed the control box cover and checked for power on the switched live which there was. There was also power coming through the boiler thermostat and supplying power to the gas valve solenoid.

Sometimes the pilot lights can click out on the gas valve, but the pilot stay lit. I turned out the pilot light and relit it but this did not solve the problem. It left two options which was the gas valve or its solenoid. I had a replacement solenoid and so I replaced the solenoid. This solved the problem and the boiler was working well again.


Disclaimer:
The works described in this blog are a record of work undertaken and should not be taken as guaranteed to solve your problem.

Work should only be carried out by persons qualified and competent to do so.

Thursday 19 July 2012

Glowworm CXi Leaking Hot Water Flow Sensor 2000801910

Was called to look at a Glow-worm CXi today because there was water leaking from the bottom of it. Looking at the boiler it was difficult to see where the leak was coming from. I could see water dripping from the bottom of the boiler near the right hand side of the plate heat exchanger. Looking from side I could see the connections to the plate heat exchanger and there was no sign of water there. It was not coming from the rear of the pump housing either. It looked to be coming from between the filling loop and the pump housing. Then I caught sight of a drip, it was coming from the hot water flow sensor's connection to the pump housing.

I stripped out the flow sensor by removing the filling loop connection and inlet filter, and disconnecting the cold inlet pipe. I suspected that the o-ring may have failed or that the pump housing had split. The o-ring looked good, but there was what looked like limescale coating the flow sensor and so assuming this problem began to clean it off. As I did so I noticed that the plastic had become soft and I was able to damage it quite easily with my nail and so decided to replace it with a new one.

The old one pictured above has been superseded by part number 2000801910 which is now made of black plastic and retails in Plumb Center for £106+VAT under part number 442716. A surprisingly costly part considering it's size and lack of complexity. Replacing the flow sensor solved the leak which was good, after a couple of days I noticed that there was actually a split in the old part as pictured below.


Disclaimer:
The works described in this blog are a record of work undertaken and should not be taken as guaranteed to solve your problem.

Work should only be carried out by persons qualified and competent to do so.